 Being from a Greek family, I have always grown up celebrating both American holidays and Greek traditions. At New Year’s we count down to midnight and pop confetti, but we also bless the Greek vasilopita (New Year’s bread) with branches from the Christmas tree. At Easter time we hunt for Easter eggs, and when it’s Greek Easter we say “Chistos anesti” (Christ has risen) and crack dyed Easter eggs with one another. We always sing “Happy Birthday” in English and in Greek, and we celebrate our Name/Saint Days, which are kind of like a second birthday.
So, one thing I love about being married to a man from Mexico is incorporating all of his traditions with my American and Greek ones. I like to dress in green, white, and red when it’s Independence Day (September 16th) or wear red or yellow underwear at New Year’s for love and prosperity. And, I truly love incorporating El Día de los Muertos (Day of the Dead) into our year’s ritual.
 I find comfort and happiness in setting up an ofrenda (offering)/altar in late October to remember my Mom and Yia Yia. I like to see their pictures and pull out little items that remind me of them–chocolates, wooden spoons, tea bags, and jewelry. Each night when I light the candles on the ofrenda, it feels somewhat magical, like a part of them is in the room with us.
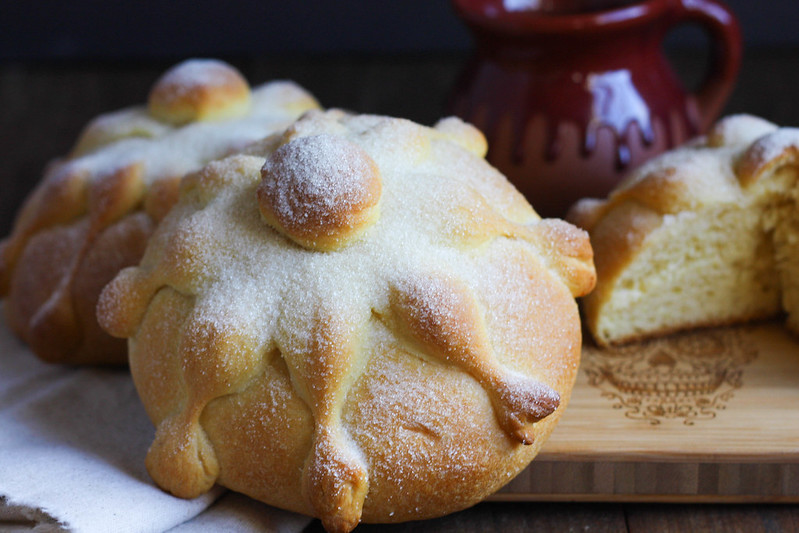
My favorite thing that I added to the ofrenda this year was the pan de muerto (bread of the dead). Both my Mom and Yia Yia were extraordinarily talented bakers, and they passed that love onto me. I have made pan de muerto for several years now, but this year it felt so meaningful to place my final sugar-dusted loaf out for them on the altar. I made sure it was warm because my mom always loved warm bread.

There is so much beauty in being able to fuse together cultures and customs, and whether you are Mexican or not, I suggest that you try making this delicious bread. It might just become a new tradition for you and your family.
pan de muerto
Click here for printable recipe.
Sponge – Makes four 6-inch loaves
2 ¼ (7 g-1 packet) active dry yeast
1 ¼ cup (150 g) all-purpose flour
2/3 cup lukewarm whole milk
→In a small bowl, mix together yeast and flour. Add the milk and mix until a homogeneous paste is formed. Cover the bowl with plastic wrap and let the sponge rest for 1 hour or until you see air bubbles on top.
Dough
2 large eggs
2 egg yolks
2 ¾ cup (350 g) all-purpose flour
1 tsp (6 g) sea salt
½ cup (95 g) granulated sugar
1 stick (114 g) unsalted butter, softened and cut into cubes
2 tsp water
Zest of half an orange
→In the bowl of a stand mixer fitted with a dough attachment, place the bubbly sponge. Add eggs and egg yolks and mix on medium speed for 3 minutes until the eggs are well-incorporated.
→Add the flour and salt and mix for an additional 4 minutes until the dough becomes elastic.
→Add the sugar and mix for 4 minutes until incorporated completely.
→Add the cubed butter, water, and orange zest. Mix with the dough hook on medium speed for approximately 9 minutes. The dough should pull away from the side of the bowl and should not be sticky. You should be able to handle it easily without having to add extra flour.*
→Remove the dough from the bowl and shape it into a sphere by cupping your hands around the dough and smoothing it into a ball. Please in a lightly oiled (neutral oil like grapeseed or avocado) bowl and lightly rub some oil on top of the ball so that the dough doesn’t dry out.
→Cover with plastic and let rest in a warm place for at least an hour or until doubled in size.
Forming the bread
→Remove the ball of dough and punch it down. Divide into 4 EQUAL portions.
→Remove 1/5 of the dough from each of the 4 EQUAL portions. Set the 4 SMALL pieces aside.
→Ball the 4 LARGE portions into smooth spheres. Place them on a parchment-lined baking sheet and flatten them slightly.
→Divide the 4 SMALL pieces into 5 equal parts. 4 pieces will be used for the bones which will stretch across the diameter of the sphere and 1 piece will be used for the little ball on top. You should have 20 small pieces of dough total.
→Form 4 little spheres first and set aside. Then, with the remaining 16 pieces of dough, form the bones. Start with one of the remaining 16 pieces and roll into a small log. Place your index finger in the middle of the log and roll and press to form an indentation. Don’t press too hard because you want the log to stay together. Then, place your middle finger in the indentation and place your index and ring finger on either side and roll to form a bone shape.
→Stretch the bone across the top of a sphere and press down firmly to secure it to the sphere. Repeat with the remaining three bones. Finally, place the small sphere on top where the 4 bones intersect.
→Cover the bread with a light towel or plastic wrap and let rise in a warm location for 1 hour.
Finishing
3 TBSP unsalted butter, melted
½ cup granulated sugar*
→Preheat the oven to 350°F.
→Bake the bread for 25-30 minutes until it is golden on top.
→Remove from oven and let cool.
→Place the sugar in a food processor or spice grinder and pulse to form a fine powder.
→Brush the tops of each bread with the melted butter. Let the butter set for a minute. Place the sugar in a sieve and lightly dust the top of each bread with sugar until white and sparkly.*
NOTES:
- Resist the urge to add extra flour to the dough. If you mix it long enough, it will obtain the right amount of elasticity to handle.
- I prefer to eat this bread warm. I think it has the best texture and flavor when it is warm from the oven. However, it will save for several days. Let cool COMPLETELY before storing in a plastic bag. If not, the bread will become soggy.
- You do not have to create a finer powdered sugar, but it does make a prettier loaf of bread that is slightly sweeter. The finer sugar seems to stick better to the loaf.
Recipe Source: Adapted from Irving Quiroz’s Panes Mexicanos

Great photos!
Thanks, Chris!!! I like the way the sugar looks on top of the bread. 🙂