 When I traveled to Mexico for the first time in 2007, I took an extra suitcase with me just to fill with treasures that I would hopefully use in my Spanish classroom one day. I planned to stuff the suitcase with Spanish packaging, maps of different cities, posters, magazines, stamps, books, and just about anything I might be able to use someday for one of my lessons. While I did fill my suitcase with many of these items, some other unexpected things found their way into my luggage. Yes, I will confess. I am 100% guilty of bringing back pan dulce and other sweets from Puebla in my carry-on. I can still see my young college self explaining my pan dulce addiction to the Mexican security guard while he raised an inquisitive eyebrow.
But, what can I say?! Up until that point, I had no idea that there was this amazing world of Mexican pastries just waiting to be discovered, sampled, and savored.
I am a baker at heart so it is no surprise that I stumbled across and walked into a little bakery in downtown Puebla one day as I meandered around town.
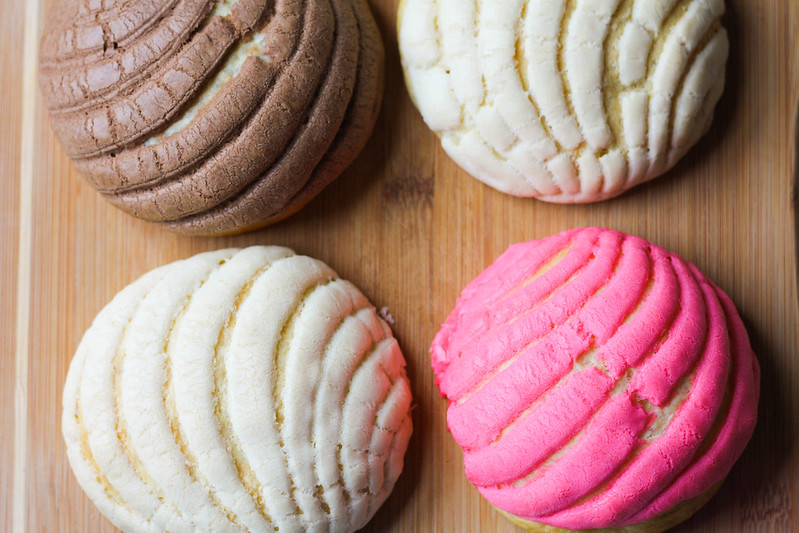
It was a small, family-run business, as most of them are, and the enticing smell of freshly baked bread floated out onto the street luring me in. Simple, open-air shelves lined the walls of the entire bakery, and they were stacked high with an extraordinary assortment of pastries. Each pastry had its own whimsical name–brides, bows, pillows, doves, kisses, etc. It seemed as if the Sugar Plum fairy had waved her magical wand over the entire shop giving a fanciful signature to each creation.
I carefully watched as a customer entered the store and grabbed a large metal tray and a pair of tongs. He went around the store swiftly snatching various pastries with the tongs and placing them on his tray. He went to the front of the store, and the girl at the countertop carefully wrapped each pastry in a piece of parchment paper and placed them all in a brown paper bag. The man paid and was on his way.
Being that I have a sweet tooth, I felt as if I had struck gold, so I too picked up a tray and meticulously selected the most tantalizing pieces of pan dulce. Somehow the cloud-like concha made its way into my selection, and I must say it was love at first bite.
 To this day, I have a hard time passing up a Mexican panadería without going in and buying a concha. For 5 pesos or so, I feel like I can judge the quality of the panadería’s product simply by taking a bite out of one of their conchas.
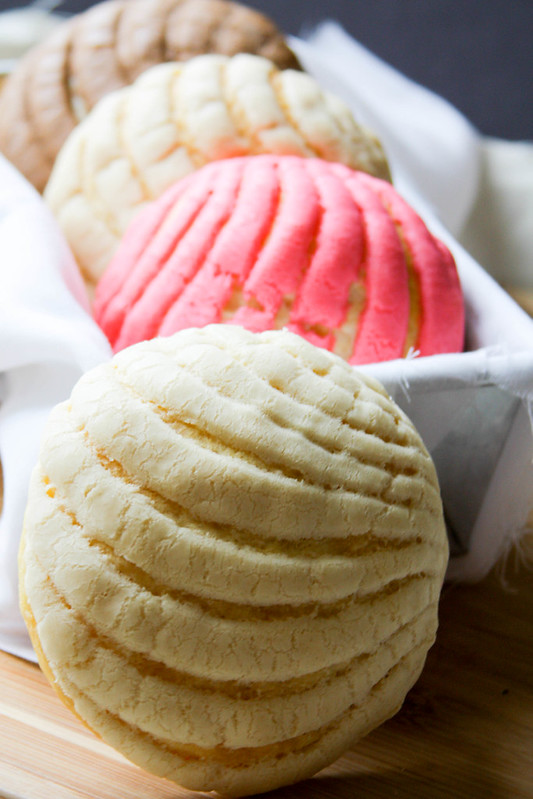
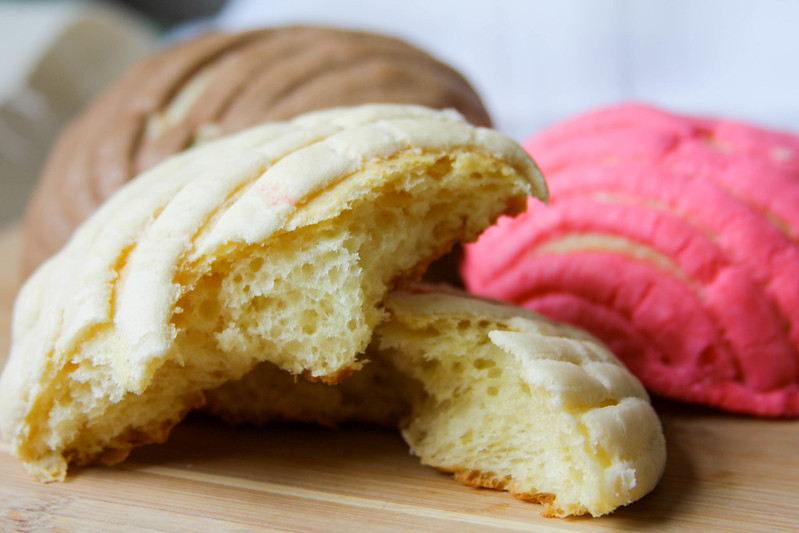
I have searched high and low for a concha recipe that captures everything I know and imagine a good concha to be–fluffy, yet moist, and slightly sweet with a sufficient amount of crunchy topping. After years of searching and testing, I am happy to offer this recipe as a faithful representation of everything I feel a concha should be.
While this recipe does take some time, the results are celebratory, and there is nothing like enjoying a sweet concha with a cup of Mexican hot chocolate. There’s that Sugar Plum fairy working her magic again!
Happy concha making! Please let me know if you decide to make these. I’d love to hear how they turn out!
PS…if you are looking for a concha cutter, I highly recommend this company! They were efficient and quick, and they offer a great product. Plus, the cutter is on sale for $12.49 right now!
PAN DULCE MEXICANO: Conchas
Click here for printable recipe.
Dough (Makes 16 conchas)
3 ¾ – 4 cups (500 g) all-purpose flour
1 1/8 tsp (7 g) salt
2 ¾ tsp (12 g) bread machine (not active dry) yeast
1 cup whole milk
1 ½ tsp vanilla extract (add to the milk)
2 eggs
1/3 cup (90 g) granulated sugar
6 TBSP unsalted butter, softened
2 TBSP (30 g) pork lard or vegetable shortening
→In the bowl of a stand mixer fitted with a dough hook, mix together flour, salt, and yeast for 1 minute on medium speed.
→Add 1 egg and half of the milk/vanilla and mix on medium speed for 1 minute. Add the remaining egg and milk/vanilla and mix on medium speed for an additional minute.
→Add the sugar and mix on medium speed for 1 minute. Finally, add the softened butter and lard/shortening and mix on medium-high speed for 5-7 minutes.
→The dough will be rather sticky and difficult to work with. Refrain from adding any flour as it will dry out the dough. Scrape down the sides of the bowl with a rubber spatula and gather the dough to the center to form a ball.
→Pour about 2 tsp of vegetable oil (I used avocado oil.) in a clean, large bowl. Rub the oil around the bottom and sides of the bowl. Carefully gather the concha dough and place it in the oiled bowl. Flip the dough over so that the oiled side is facing up. The entire ball of dough should be covered with a thin layer of oil. This will prevent the dough from drying out.
→Cover the bowl with plastic wrap in place in the refrigerator to rise. Leave in the refrigerator for 8 hours or overnight.
—–
→Remove the dough from the refrigerator. Lightly flour your work surface and place the ball of dough in the middle. Punch it down.
→Divide the dough into 16 equal portions. Each ball will weigh approximately 60-65 g.
→Take a small ball of dough in one hand and place on a lightly floured surface. Cup your hand over the dough and using a circular motion, roll the dough into a smooth ball. [You can watch this video clip to see what I’m talking about.] Place on a parchment-lined baking sheet seam side down. Repeat with remaining dough. You will need to use two baking sheets. Place 8 conchas on one and 8 on another. They conchas expand quite a bit during rising and baking, so be sure to leave enough room in between each one.
→Let the conchas rise for 2 hours or until doubled in size.
Sugar Topping (Makes about 14 servings)
3/4 cup (100 g) all-purpose flour
1 cup (100 g) powdered sugar
6 TBSP unsalted butter, softened
1 TBSP vegetable shortening
1 ½ tsp vanilla extract
¼ tsp baking powder
5-7 drops of pink food coloring (I used Americolor gel paste.)
1 tsp cocoa powder
2 TBSP butter
→While the conchas are rising, create the sugar topping. Place the first 6 ingredients in the bowl of a stand mixer fitted with a paddle attachment. Beat on medium speed for 1-2 minutes or until the ingredients form a ball of soft dough.
→Divide the sugar topping into two balls. One ball will remain vanilla; you can set this to the side. Divide the remaining ball of topping into two. Place one of these balls back into the stand mixer and add 5-7 drops of pink food coloring. Mix on medium speed until the color is completely incorporated. Remove the ball of pink dough and place to the side. Place the remaining ball of topping into the mixer. Add 1 tsp of cocoa powder. Mix on medium speed until the cocoa is completely incorporated.
→Divide the ball of vanilla topping into 8 equal parts. Divide the ball of pink topping into 4 equal parts, and divide the ball of chocolate topping into 4 equal parts. You will have 16 balls of topping total. Using a tortilla press and two pieces of plastic grocery bag (or using your hands), flatten each ball of sugar topping into a 2.5-3” disc. Lightly flour a concha cutter and press into the flattened topping. Press hard enough to make a mark, but don’t cut through the topping! If you don’t have a concha cutter, you can use a knife to make the shell marks.
→Melt 2 TBSP of butter in the microwave. Lightly brush the butter on top of each concha. Carefully place the stamped topping on the buttered concha. Do NOT press down or you will deflate the concha. Repeat with the remaining topping and conchas.**
→Bake in preheated 350°F oven for 20-22 minutes. Remove and let cool on a cooling rack.
**You can place the topping on the conchas at two different times. 1)You can place it on the concha right after you have formed each one and before they rise for two hours. In this case, you should press down on the topping so that it sticks. When the dough rises, it will create a more spread out concha pattern. 2)You can place the topping on the conchas after they have risen. In this case, you will have to be careful not to flatten the dough. This yields a neater-looking concha pattern. It is your preference. The ones below were made using method #2.
NOTES:
- I suggest making the dough one day before you plan to eat/serve these.
- Conchas are best eaten on the day that they are made. However, they will keep for 1-3 days in a plastic container at room temperature. I don’t like to totally seal container because I find that the topping becomes mushy. I simply lay the lid on top, but I don’t push it down. You could also store them in a plastic bag, but once again, I wouldn’t seal the bag shut completely.
- Many recipes call for the use of vegetable shortening in both the dough and topping. I try to eliminate vegetable shortening from my recipes as much as possible. For this reason, I use pork lard (a somewhat healthier/natural alternative) in the dough. The taste of the lard is not detectable at all. Rather, it maintains their freshness. I had to add 1 TBSP of shortening into the topping because I found that the topping spread too much without it. I tried using some lard in the topping, but I didn’t like the final taste.
- I searched high and low for a concha cutter in Mexico, but couldn’t find one. I bought mine from a company in the U.S. called Concha Cutter. I highly recommend them. Their service was great and they shipped the cutter out very quickly. I love it!
Recipe Source: Adapted from Irving Quiroz’s Panes Mexicanos

Nicole, these look and sound like absolute perfection! I love the HOT pink one.
The colored ones are always so much fun! I told @meeexiiicooo that I can’t wait to make green, white, and red ones for next 16 de septiembre!
Hello Nicole! When you say Bread machine instead of active yeast what do you mean by that? I just wanna make sure I’m buying the right ingredients. Thank you!
Hi Elexis,
Bread machine yeast is also called instant yeast. It doesn’t require warm water to activate it. Active dry yeast requires warm water to activate it. It can still be used in this recipe, you would just have to warm the wet ingredients (100-110 degrees F) before adding them to the dry yeast. Hope that helps!
I made these yesterday and they go great with my morning coffee. They came out fantastic. I would like more pan dulce recipes, so many varieties to make.
Nicole! Se ven buenísimas!! Me encantan las conchitas. Un día de estos me daré el tiempo de hacerlas. Así se llama la levadura? Bread Machine Yeast? Yo tengo en casa easy yeast, es igual? Besitos
Hola Karla! Muchas gracias! Realmente, si encuentras el tiempo, valen la pena. La levadura que usé, se llama Bread Machine Yeast. Aquí te mando una foto. Investigué un poco y la Bread Machine Yeast se llama Easy o Instant yeast también. Así que la que tienes es igualita a la que usé. Espero que te salgan bien 🙂
These look great! I couldn’t ever pass these up as a kid. I’m working on a Cinco De Mayo recipe roundup and was wondering if you were interested in having your recipe featured. It would include one picture from this recipe and a link to your site and the recipe itself. 🙂 Let me know if that’s of interest to you and I will get it all set up. Thanks!
Hi Chantal! Thanks so much for visiting my blog. I totally agree…I’m crazy for conchas, too! They are so hard to resist. I would love to have my recipe featured in your Cinco de Mayo roundup. That’s a fantastic idea. Please let me know if I can provide any additional information or photos for you. If you need anything, feel free to email me at flanandapplepie@gmail.com. ¡Muchísimas gracias por leer!
If you ever go to Tijuana, Baja California, México, try “Panadería La Mejor”. They have the best conchas in the world. Worth the trip.
Thanks so much for the recommendation! I’m always in search of delicious conchas, and I will definitely be writing this down so I can visit some day. 😉👍😊
My daughter and I are over here drooling… I grew up on Conchas! I used to bring them to school as my birthday treats when I was little. I have been wanting to find a recipe that does this beloved pastry justice. We can’t wait to try your recipe!
I made them this morning and followed the recipe to the t. Loved them and they came out perfect. This is a keeper! Thank you
Oh yay! I’m so happy to hear. And, eating them warm is even better. Right?! Thank you for sharing your experience.
I made these today! They are delicious! They didn’t come out as large as the picture, but they taste great! But I actually made the dough yesterday and baked them today. It took about 2 1/2 hrs to rise, but it was worth the wait! Thanks for sharing your recipe! I live in Rockport, Tx and unfortunately we don’t have any panaderias here. So this a treat!!
Thanks again,
Mirtha Benavidez
Hi Mirtha! I love hearing from readers who try out my recipes. I’m so happy that the conchas turned out. I like to make the dough ahead a day before, too. I think they have better flavor. No panaderías around here either, so it’s always a nice treat when I decide to make them. Definitely worth the effort. Enjoy!
Hi there I was just wondering if I can use the instant dry yeast instead of bread machine yeast?
Hi Juanita! Yes, you can use instant dry yeast. It is the same as bread machine yeast. Good luck making the conchas. I’d love to hear how they turn out.
Could you use butter in topping instead of shortening?
Yes, I usually opt for butter whenever possible. The only issue I found when I did an all butter topping was that it melted too much and didn’t keep the concha shape. That’s why there is only 1 TBSP of shortening to the 6 TBSP of butter. I have used lard instead of shortening in the topping, and the flavor really isn’t detectable. I’m not a fan of hydrogenated fats, so if I did use shortening, it would be a non-hydrogenated version. I hope that helps!
Yes it makes sense. Thank you for reply.
Im definitely trying this. Im from Belize they have this kind of comchas ☺
Hi Nicloe! I just did the dough. So im just wondering it says you put it in the refrigerator for 8 hr or overnight. Will it rise like that?
A slow rise will occur in the refrigerator. This really helps the dough to develop its flavor. Once you take the dough out of the refrigerator, it will have time to warm up and then a second rise will occur.
Hi Lucy,
I put the dough in the refrigerator overnight to slowly the rising process and develop flavor. The dough will continue to rise once you take it out of the fridge.
Im definitely trying this conchas ☺
How did your conchas turn out?
Can I put the ingredients in my bread machine to make the dough? I don’t have a stand mixer. And because I have arthritis, mixing yhe dough by hand is very difficult. Also, what order fo I put the ingredients into the bread machine?
Thank you
Yes, you should be able to make the dough in the bread machine. Put all of the dry ingredients in the bottom first, including the yeast. You must use instant dry yeast (so you don’t have to activate it). Then, put the wet ingredients on top and start the machine. Good luck! Let me know how it works out.
Can the first dough be made 24 hours in advance?
Yes, you can absolutely make the dough 24 hours in advance. Just be sure to refrigerate it.
Yes, you can certainly make the dough 24 hours in advance. I wouldn’t wait too much longer to use it though because then it can start to ferment and develop a flavor more like sourdough.
Hello. I don’t have a bread machine so how can I prepare these without one?
Hi Tanya!
I don’t have a bread machine either. I use my KitchenAid stand mixer with a dough hook. If you don’t have a stand mixer with a dough hook, you can always need the dough by hand. Thanks!
I have a question. Does the batter gets easier to handle once you take it out of the refrigerator or is it always sticky and hard to manage? I made a couple of recipes yesterday before I run into your recipe but they were both sticky and I couldn’t help it but to add more flour. They came out ok but I want to try again but next time I want to try your recipe and I will let them rise overnight. Thanks
Hi Alexa! Yes, the dough does certainly get easier to handle once it has time to rest in the refrigerator. Make sure you knead it well though before letting it rest. If it is still sticky once you take it out of the fridge, you can start by sprinkling a little flour on a work surface to knead it. Add flour sparingly so that you don’t dry out the dough.
I tried the recipe and my con had came out almost burned on the edges and crunchy. Is this normal?
No, you probably needed to bake them for less time. Every oven is different. My oven tends to run on the “cooler” side which is why my bake time was probably longer. Sorry they came out burnt. Hopefully you were able to adjust for the second batch.
I wanna make these conchas so bad jij. I have a question are the conchas soft and fluffy?
Yes, indeed! These conchas are super soft and fluffy.
Wow I was so impressed with how they came out love this recipe thank you. Lots of love Elena.
Hi Elena! Thanks so much for taking the time to let me know this. I’m so happy to hear this.
What is the benefit of leaving the dough to rest overnight in the fridge?
Hi Barbara,
The only purpose for the overnight rest is to develop the flavor and make the dough a little more workable. However, I have had success with making the conchas the same day and letting them rise for a longer period of time. I actually think I like the texture a little better this way. Thanks for stopping by!